I can't really believe that my youngest is now in high school. We started our school year yesterday and so far things have gone well. Things are completely different this year than in previous years so it's taking some getting used to. For one, we're using a different curriculum for the majority of our studies. I'm also taking a greater role in her schoolwork and actually sitting down with her and doing most things side-by-side. It's definitely nice to discuss things as they come up and this gives me greater flexibility to determine what needs to be written out compared to answered orally.
Yesterday we started at 10:30am to take advantage of the cooler morning for yard work, but were done by 2:30pm. Today we got started around 8am because it was raining, but were done by 12pm. That included a break to take the horses out since the rain abated for a bit. I know it's too early to tell for certain, but I think this year is going to be nice.
I'm now making bread for hubby's lunch and will make Sweet Zucchini Biscuits as a thank-you to the neighbor for taking care of the horses Saturday so we could go out as a family.
Tuesday, August 7, 2012

Sunday, July 22, 2012
Upcoming School Year
I decided to make a few changes for this school year. We've used Tapestry of Grace for the past six years and have loved it. I think it was more me, but I've been amazed at the nuggets of history that Samantha has remembered. Since we just bought a farm and will be learning how to garden, preserve our harvest, keep chickens, own horses and possibly keep a cow, I decided to do something different and hopefully more in line with our new lifestyle. The most important focus for next year, however, is character training and everything else will take a backseat as necessary.
I searched around and found a unit study on Anne of Green Gables called Where the Brook and River Meet. The same publisher, Cadron Creek, puts out an elementary unit study on Little House on the Prairie and a middle school one on the Narnia series. The curriculum covers history (from a Canadian perspective), Bible, literature, writing, fine arts, occupational education, physical education, health and economics. I'm supplementing with several books throughout the year for history, literature and Bible and we'll use the methods presented in Teaching the Classics to discuss them.
I also bit the bullet and purchased Teaching Writing: Structure and Style and Student Writing Intensive Level C from IEW. I've been looking at IEW for several years, but have been very intimidated by it. I haven't been able to find another writing curriculum that I actually liked, so I figured I'd go for it. It seems easy enough once I actually got it and looked through it. Samantha didn't do too well with algebra last year so we're starting over with Video Text. We'll use Apologia Biology for science and Analytical Grammar for grammar.
I'm trying to get a service-oriented group for middle and high school students started through one of the local Christian homeschooling groups. We'll partially model it after the concepts in Do Hard Things by Alex and Brett Harris. I'm hoping we'll get enough interest and can really make an impact not only in the community, but in the lives of our teenagers.
And to round out our year, Samantha will be joining the IEA team this fall for competitive horse riding. This is a group in which the kids are ranked by levels and then are given a horse at random on competition day. They're given a certain amount of time to work with the horse, but must then ride to the best of their ability. This helps separate the truly good riders from the riders who just have rich parents and fancy horses.
I searched around and found a unit study on Anne of Green Gables called Where the Brook and River Meet. The same publisher, Cadron Creek, puts out an elementary unit study on Little House on the Prairie and a middle school one on the Narnia series. The curriculum covers history (from a Canadian perspective), Bible, literature, writing, fine arts, occupational education, physical education, health and economics. I'm supplementing with several books throughout the year for history, literature and Bible and we'll use the methods presented in Teaching the Classics to discuss them.
I also bit the bullet and purchased Teaching Writing: Structure and Style and Student Writing Intensive Level C from IEW. I've been looking at IEW for several years, but have been very intimidated by it. I haven't been able to find another writing curriculum that I actually liked, so I figured I'd go for it. It seems easy enough once I actually got it and looked through it. Samantha didn't do too well with algebra last year so we're starting over with Video Text. We'll use Apologia Biology for science and Analytical Grammar for grammar.
I'm trying to get a service-oriented group for middle and high school students started through one of the local Christian homeschooling groups. We'll partially model it after the concepts in Do Hard Things by Alex and Brett Harris. I'm hoping we'll get enough interest and can really make an impact not only in the community, but in the lives of our teenagers.
And to round out our year, Samantha will be joining the IEA team this fall for competitive horse riding. This is a group in which the kids are ranked by levels and then are given a horse at random on competition day. They're given a certain amount of time to work with the horse, but must then ride to the best of their ability. This helps separate the truly good riders from the riders who just have rich parents and fancy horses.
Friday, January 13, 2012
Discipling Our Children

I'm rereading a book by Paul David Tripp called Age of Opportunity: A Biblical Guide to Parenting Teens. I read it several years ago after I purchased it from a homeschool conference, but think it should be reread periodically as a refresher. I'm learning new things this time through because I'm in a different place spiritually, and my daughter is older and hopefully more spiritually and emotionally mature. The last time I read it was with my son in mind, as my daughter was not yet a teenager.
Something struck me today and I'd like to share it. Chapter 3 has a section that discusses interpretation. Paul says,
"...all children think, and the thoughts of their hearts shape the way they live their lives...Parents who understand that their children are interpreters do everything they can to get them to think out loud and instill in them a distinctively biblical view of life. They will realize that this is usually not done in formal times of instruction like family worship, but spontaneously as issues come up in the course of family life...It is vital that as we live in the mundane moments of life with our children, we teach them to see life from God's perspective. Parents who understand that their children are not simply reacting to the facts, but are interpreting the facts in a way that gives them a particular shape and meaning, will ask good questions and be good listeners."I don't think I've ever really stopped to think about this, but it's true. I find myself wondering why in the world my daughter gets so upset about certain things, and I now understand it's because she's interpreting them in a different light from what I am. These are good teaching moments, once we get past the anger.
Paul goes on to talk about "fixing" a fruit tree that won't produce good, juicy fruit by stapling good, juicy fruit to the branches. He didn't solve the problem of the tree not producing good fruit, but only made an outward change that won't last. The new fruit doesn't have any support and will eventually rot.
"I'm convinced that much of what we have called Christian parenting is nothing more or less than 'fruit stapling'...This 'sin is bad, don't do it' brand of parenting forgets that sin is not only a matter of behavior, but a matter of the thoughts and motives of the heart as well. It fails to recognize that if the heart does not change, any behavioral changes that take place will be temporary and cosmetic, because they will not be attached to roots in the heart."I've fallen into the trap of trying to change my children's behavior by "stapling" instead of getting to the root of the problem. It only creates more work for all of us, however, because the original problem never gets solved and typically only grows bigger.
Our biggest problem right now is that our daughter doesn't take discipline well at all. She immediately gets an attitude and doesn't listen to what we say, instead arguing or negating everything. It's quite frustrating to try to have a simple conversation with her or give her a simple instruction, only to have it turn into an argument.
Sunday, January 1, 2012
Verse for 2012
So then, just as you received Christ Jesus as Lord, continue to live in him, rooted and built up in him, strengthened in the faith as you were taught, and overflowing with thankfulness.
Sunday, December 25, 2011
New Blog Open
I just started a new blog titled Adventures in Homesteading. The address is http://dicefamilyhomesteading.blogspot.com/ if you'd like to follow me there as well. Paradice Academy will be used for general family news and school related news, but all homesteading news will be at the new blog.
Wednesday, November 23, 2011
Pie Recipes
I decided to try two new pie recipes this Thanksgiving. I know, a holiday is probably not the best time to try something new, but I hate doing the same old thing. I've done a pumpkin cheesecake for several years, but this year I found a recipe with a cheesecake layer on the bottom, a regular pumpkin layer on top of that and then it's all topped with a yummy streusel topping. I also found a recipe for pecan pie (one of my husband's holiday requests) that doesn't use corn syrup. I don't know about you, but just the idea of using corn syrup grosses me out. I won't even eat one bite of regular pecan pie if it's made with the nasty stuff.
Pie Crust
Pie Crust
Ingredients
·
1/2 cup vegetable shortening or butter, frozen (I used butter)
·
1 1/2 cups all-purpose flour
·
1/2 teaspoon salt
·
1/2 cup ice cold water
Directions
1. Mix
shortening, flour, and salt together with a fork or a pastry blender until very
crumbly or pulse gently in a food processor. If using a food processor, transfer to a medium mixing bowl at this point. Add as much water as needed, one tablespoons at a time to hold together, and mix lightly
with a fork. Wrap in plastic wrap and refrigerate for 30 minutes.
2. Roll
gently on a floured pastry cloth to about an inch larger than pie plate. Fold
carefully in half, lift to pie plate, and unfold. Press into pan. For a
single-crust pie, trim with a small knife to about 1/2 inch beyond rim. Fold
up, and pinch so edge of pie is raised from rim.
3. Follow directions for whichever pie recipe you're using for baking instructions.
*Add 1 T. fine sugar to flour if desired for a sweet pie.
Ingredients
·
1 cup light brown sugar
·
2 T white sugar
·
1/2 cup butter
·
2 eggs
·
2 T bourbon or Grand Marnier (not in original recipe)
·
1 tablespoon all-purpose flour
·
1 tablespoon milk
·
1 teaspoon vanilla extract
·
1 cup chopped pecans
·
½ cup halved pecans (not in original recipe)
Directions
1. Preheat
oven to 350 degrees F.
2. In
a large bowl, beat eggs until foamy, and stir in melted butter. Stir in the
brown sugar, white sugar and the flour; mix well. Add the milk, bourbon,
vanilla and nuts.
3. Flour
both sides of pie crust before placing in pan. Pour into an unbaked 9-in pie
shell. Spread halved pecans evenly on top. Bake in preheated oven for 15
minutes, then reduce heat to 300˚ and bake an additional 50-55 minutes, or
until done.
4. Allow
to sit overnight so the flavor mellows and the texture sets up.
Old Fashioned Paradise Pumpkin Pie
Ingredients
1 (9 inch) pie shell
1 (8 oz) cream cheese, softened
1/4 cup white sugar
1/2 t. vanilla
1 egg, beaten
1 1/4 c. pumpkin puree
1 c. evaporated milk
2 eggs, beaten
1/4 c. packed brown sugar
1/4 c. white sugar
1 t. cinnamon
1/4 t. ground nutmeg
1/4 t. salt
2 T. flour
2 T. brown sugar
4 T. flour
4 T. butter, softened
1 cup chopped pecans
Directions
1. Preheat oven to 350 degrees.
2. To make cheesecake layer: In mixing bowl, beat cream cheese until smooth. Beat in 1/4 cup sugar, then add vanilla and 1 egg. Beat mixture until light and smooth. Spread into pie shell and chill for 30 minutes.
3. To make pumpkin layer: In a large bowl, combine pumpkin puree, milk, eggs, brown sugar, white sugar, cinnamon, nutmeg, salt, and flour. Mix until all ingredients are thoroughly combined.
4. Pour pumpkin mixture over cream cheese layer. Cover edges of crust with foil and bake in oven for 25 minutes. Remove foil and bake an additional 25 minutes.
5. To make streusel layer: While pie is in the oven, combine flour and brown sugar in small bowl. Mix well, then add softened butter and stir until combined. Mix in pecans.
6. After pie has been in the oven for 50 minutes, remove and sprinkle with pecan streusel evenly over top. Bake for an additional 10-15 minutes, until a toothpick inserted comes out clean.
Wednesday, November 9, 2011
Thanksgiving
*I'm thankful for a husband who does little (and big) things to make my day better.
*I'm thankful for healthy children.
*I'm thankful that my husband makes enough money to support us while I homeschool.
*I'm thankful for friends to get together with and laugh and have a good time.
*I'm thankful for my wonderful sister and that we have such a good relationship.
*I'm thankful that my daughter and I enjoy being with each other.
*I'm thankful for healthy children.
*I'm thankful that my husband makes enough money to support us while I homeschool.
*I'm thankful for friends to get together with and laugh and have a good time.
*I'm thankful for my wonderful sister and that we have such a good relationship.
*I'm thankful that my daughter and I enjoy being with each other.
Tuesday, October 25, 2011
Peter Reinhart's Sourdough Starter
I think my previous sourdough was a failure. I'm not sure if I mentioned this in a previous post, but starting at about day four or five it developed what looked like white strands on the top connecting little white balls, almost like spider eggs. It also started smelling pretty bad and never really developed the nice, yeasty aroma I kept reading about. I did a ton of research and came across the site BreadTopia. This site is amazing if you are truly interested in bread baking. Eric has tons of videos, including a series on starting, maintaining, freezing, reviving, and drying your sourdough starter.
The method he uses for making a starter was taken from Peter Reinhart, the author of The Bread Baker's Apprentice, Peter Reinhart's Whole Grain Breads, and Crust and Crumb. This method utilizes pineapple juice instead of purified water, though you can use water if desired. The reason for the pineapple juice is that the acidity in the juice keeps the pH balance where it's supposed to be so the good bacteria wins and the bad bacteria doesn't take over. I'm hoping this will take care of the problem I experienced with the first starter.
I did try to revive the first starter, but didn't have any luck. Even with aerating it several times over two days, it didn't grow and started developing white balls on the top. Since it also started smelling, I threw it out.
Now for my third attempt. I combined 3 1/2 tablespoons of flour and 1/4 cup of pineapple juice in a mason jar and covered it loosely with plastic wrap. This is now supposed to sit on my counter for approximately 48 hours. During that time I need to aerate it 2-3 times per day. Bubbles may appear, but it is also normal to see absolutely no activity.

The method he uses for making a starter was taken from Peter Reinhart, the author of The Bread Baker's Apprentice, Peter Reinhart's Whole Grain Breads, and Crust and Crumb. This method utilizes pineapple juice instead of purified water, though you can use water if desired. The reason for the pineapple juice is that the acidity in the juice keeps the pH balance where it's supposed to be so the good bacteria wins and the bad bacteria doesn't take over. I'm hoping this will take care of the problem I experienced with the first starter.
I did try to revive the first starter, but didn't have any luck. Even with aerating it several times over two days, it didn't grow and started developing white balls on the top. Since it also started smelling, I threw it out.
Now for my third attempt. I combined 3 1/2 tablespoons of flour and 1/4 cup of pineapple juice in a mason jar and covered it loosely with plastic wrap. This is now supposed to sit on my counter for approximately 48 hours. During that time I need to aerate it 2-3 times per day. Bubbles may appear, but it is also normal to see absolutely no activity.

Day 1 right after mixing.
Monday, October 24, 2011
Kefir
I just received my kefir grains from Keysands through Amazon and made my first two batches of Kefir. I rinsed the grains with Dasani water and put them in a mason jar with 1 cup of organic 2% milk. I left it on the counter for 24 hours to ferment and drained the milk away from the grains. The directions stated that the first batch would probably be "off" and could be discarded. I dumped the milk down the drain and transferred the grains to a clean mason jar. I added one cup of milk and put the lid on, but didn't tighten it all the way.


Taken a few hours after transferring.

After 20 hours I drained the milk into a glass cup and separated out the grains.

Once it was done draining, I put the grains in the bottom of mason jar. They look similar to cottage cheese.

I poured in two cups of milk and if you look closely you can see some of the grains floating on the top towards the left. The directions state to use about 1 tablespoon of kefir grains per cup of milk. This time I used organic creamline whole milk.

This is what was left in the glass after straining. You can see a thin line towards the bottom of the glass. That's the whey. I just left it for now. I'll either mix it back in and use it in a smoothie, or try to strain it out and have whey and cream cheese.
New Apron
I made myself a new apron this morning. I have an over-the-head full-size apron, but sometimes I want a shorter one. I already have one, but I think it's too pretty to use. I'm afraid to get it dirty for fear the washing machine will damage it.
I decided to use a kitchen hand towel that has some bleach spots on it and a ribbon we got with our quilt. I folded the top edge over about one-inch to hide another bleach spot. I then tucked a length of ribbon into each side and sewed right on the existing seam. Horse Girl suggested next time I thread the ribbon through the top and leave it loose and adjustable. That would have been much easier.
Cost of new apron = FREE


I decided to use a kitchen hand towel that has some bleach spots on it and a ribbon we got with our quilt. I folded the top edge over about one-inch to hide another bleach spot. I then tucked a length of ribbon into each side and sewed right on the existing seam. Horse Girl suggested next time I thread the ribbon through the top and leave it loose and adjustable. That would have been much easier.
Cost of new apron = FREE

I folded the bottom up about a third and sewed the edges. I made an oops in the beginning and accidentally sewed the top edge of the pocket. I was so proud of myself too, because I just followed one of the lines on the towel and made a nice straight line. Oh, well!

I also sewed a line up the middle of the folded section to make two pockets.
Sunday, October 23, 2011
Pizza Crust/Breadstick Recipe
One of my menus this month features breadsticks so I searched around until I found some pizza dough and breadstick recipes. I ended up combing several recipes in order to get what I wanted. The ingredient list and most of the directions come from Passionate Homemaking. Here's the recipe, including my changes.
2 T. yeast
3 1/2 cups water, divided (110 degrees)
3 T. acid medium (yogurt, kefir, lemon juice, whey, apple cider vinegar)
1 t. honey
1/4 cup honey
1 T. salt
8-10 cups whole wheat flour (or combination with kamut)
Soaking:
Combine 8 cups flour, 3 cups water, substituting some of the water with 3 T. acid medium, and 1/4 cup honey. Allow to soak for 12-24 hours.
Kneading:
After soaking, activate yeast in a small container with the remaining 1/2 cup warm water and 1 t. honey. Allow to foam up for about 5 minutes. Add the proofed yeast to the soaked flour, along with the salt. Mix well and let rest (autolyse) for 15 minutes. Knead for 5-10 minutes, adding additional flour as needed. Transfer to a greased bowl, turning to coat. Let rise until double.

For Pizza: Preheat oven to 500 degrees. Divide into four sections. Roll each into desired shape. (Roll on parchment paper, turning 1/8 of a turn once every roll, only rolling away from your body.) Pre-bake 5 minutes. Remove from oven and top with desired toppings. Bake for an additional 10-165 minutes, watching to make sure edges and cheese don't burn.
For Breadsticks: Preheat oven to 350 degrees. Dough will be slightly sticky so you'll need to flour your hands as you roll. Divide into portions slightly larger than a ping-pong ball (I ended up with 7, but some of mine were a bit long). Shape each onto a ball; roll each into a 9-inch rope. Place on greased baking sheets. Cover and let rise in a warm place for 40 minutes or until doubled. Bake 18-22 minutes or until golden brown. Remove to wire racks. Brush with butter and sprinkle with garlic salt.


Mix dough completely as instructed and then divide into four portions. Freeze the dough in individual Ziploc bags. You do not need to pre-bake. When you are ready to use, thaw in the refrigerator several hours, bring to room temperature and then roll out and assemble as desired.
2 T. yeast
3 1/2 cups water, divided (110 degrees)
3 T. acid medium (yogurt, kefir, lemon juice, whey, apple cider vinegar)
1 t. honey
1/4 cup honey
1 T. salt
8-10 cups whole wheat flour (or combination with kamut)
Soaking:
Combine 8 cups flour, 3 cups water, substituting some of the water with 3 T. acid medium, and 1/4 cup honey. Allow to soak for 12-24 hours.
Kneading:
After soaking, activate yeast in a small container with the remaining 1/2 cup warm water and 1 t. honey. Allow to foam up for about 5 minutes. Add the proofed yeast to the soaked flour, along with the salt. Mix well and let rest (autolyse) for 15 minutes. Knead for 5-10 minutes, adding additional flour as needed. Transfer to a greased bowl, turning to coat. Let rise until double.

Dough ready to rise.
Baking:For Pizza: Preheat oven to 500 degrees. Divide into four sections. Roll each into desired shape. (Roll on parchment paper, turning 1/8 of a turn once every roll, only rolling away from your body.) Pre-bake 5 minutes. Remove from oven and top with desired toppings. Bake for an additional 10-165 minutes, watching to make sure edges and cheese don't burn.
For Breadsticks: Preheat oven to 350 degrees. Dough will be slightly sticky so you'll need to flour your hands as you roll. Divide into portions slightly larger than a ping-pong ball (I ended up with 7, but some of mine were a bit long). Shape each onto a ball; roll each into a 9-inch rope. Place on greased baking sheets. Cover and let rise in a warm place for 40 minutes or until doubled. Bake 18-22 minutes or until golden brown. Remove to wire racks. Brush with butter and sprinkle with garlic salt.

Shaped and rising

Baked, buttered and salted! Yum!
Freezing:Mix dough completely as instructed and then divide into four portions. Freeze the dough in individual Ziploc bags. You do not need to pre-bake. When you are ready to use, thaw in the refrigerator several hours, bring to room temperature and then roll out and assemble as desired.
Wednesday, October 19, 2011
No-Knead Bread
I had two recipes for no-knead bread that I wanted to try, but decided to go with the one that didn't require sourdough. This particular recipe calls for regular bread flour, but I used freshly ground hard white. I think the amount of flour needs to be increased by at least 1/2 cup because the dough after 20 hours was very liquidy and would not hold its shape. I ended up adding the additional flour during the shaping stage so I could get it to hold its shape and stop sticking to my counter and the towel. The original recipe is as follows, with my changes and suggestions marked in blue.
I have to say this bread was amazing. Even Horse Girl liked it and she has been very critical of my baking lately. I had two pieces fresh out of the oven smothered in butter.
No-Knead Bread
3 cups bread flour (increase to at least 3 1/2 cups if using freshly ground flour)
1/4 teaspoon instant yeast
1/23/4 tablespoon kosher salt (too salty with 3/4 T. so maybe it was only supposed to be 3/4 t.?)
1 1/2 cups warm water
Parchment paper
Covered pot (5-qt or larger that can withstand a 450 degree oven)
1. Mix dough: The night before, combine all ingredients in a big bowl with a wooden spoon until dough just comes together. It will be a shaggy, doughy mess. Cover with plastic wrap and let sit 12-20 hours on countertop.
2. Shape and preheat: The dough will now be wet, sticky and bubbly. With a wet spatula, dump the dough on a floured surface. Fold ends of dough over a few times with the spatula and nudge it into a ball shape. You can use your hands if you like, just keep your hands wet so the dough doesn't stick. Lay a piece of parchment paper on cotton towel (not terry cloth) and generously dust with flour.Generously dust a cotton towel (not terrycloth) with flour. Set dough seam side down on top of parchment paper towel. Fold towel over the dough. Let it nap for 2 hours. When you've got about half an hour left, slip your pot into the oven and preheat to 450 degrees.
3. Bake: Your dough should have doubled in size. Remove pot from oven.Holding towel, turn over and dump wobbly dough into pot, using your hands to get the dough off the towel. Shake to even out. Remove towel and transfer dough to pot, leaving parchment paper around outside. Cover. Bake 30 minutes. Uncover and bake an additional 15-20 minutes or until crust is beautifully golden and middle registers 210 degrees. Remove and let cool on wire rack. Can re-crisp crust later in 350 degree oven for 10 minutes.


I have to say this bread was amazing. Even Horse Girl liked it and she has been very critical of my baking lately. I had two pieces fresh out of the oven smothered in butter.
No-Knead Bread
3 cups bread flour (increase to at least 3 1/2 cups if using freshly ground flour)
1/4 teaspoon instant yeast
1/2
1 1/2 cups warm water
Parchment paper
Covered pot (5-qt or larger that can withstand a 450 degree oven)
1. Mix dough: The night before, combine all ingredients in a big bowl with a wooden spoon until dough just comes together. It will be a shaggy, doughy mess. Cover with plastic wrap and let sit 12-20 hours on countertop.
2. Shape and preheat: The dough will now be wet, sticky and bubbly. With a wet spatula, dump the dough on a floured surface. Fold ends of dough over a few times with the spatula and nudge it into a ball shape. You can use your hands if you like, just keep your hands wet so the dough doesn't stick. Lay a piece of parchment paper on cotton towel (not terry cloth) and generously dust with flour.
3. Bake: Your dough should have doubled in size. Remove pot from oven.

Sorry about the half eaten loaf. I forgot to take pictures until after we sampled it.

I close-up of the inside. Look at the wonderful crumb!
Tuesday, October 18, 2011
Monthly Menu
Weekly grocery shopping is such a time hog that I decided to find a way to shorten the time spent every month. My time in the actual store is only about 45 minutes, but when you add on the driving, putting everything away and pre-planning, you have a pretty lengthy process. I would guess I was previously spending 2-2 1/2 hours per week total, not including cutting coupons. I'm not into extreme couponing and don't stockpile, so I only cut coupons for the items I actually plan to purchase. I also only shop primarily at the commissary with occasional trips to Publix for their BOGO deals. I simply don't have time in my day/week/month to spend cutting, planning, organizing, shopping, storing and figuring out what to do with all of the products I would accumulate if I was an extreme couponer. If it works for you, great! I don't have the brain energy to do it.
I do, however, plan to start making a monthly trip to Whole Foods, Earth Fare or Trader Joe's and a twice monthly trip to the farmer's market. I also plan to increase my order from Bread Becker's to take advantage of their bulk grains and beans. I would love to be able to order from Azure Standard, but it doesn't look like it's a good deal to have it shipped to the east coast.
As always, I started with the internet and began researching monthly menu planning. I've done this in the past, but haven't stuck with it for any length of time. I found that in the past I didn't spend enough time planning everything out before trying to implement it. This time around I'm spending several weeks getting the menu just right, making sure it's filled with foods we won't mind eating on a monthly basis and making sure we have plenty of variety. As part of my healthy eating goal I've made sure the majority of the meals utilize healthy cooking techniques and ingredients.
For now I'm going to try to plan one menu to last us at least 3 months. The menu will simply repeat itself at the beginning of each month. I did not plan for holidays or special events, but figure that should not be a problem as we get to them. Each day of the week uses a different meat or type of dish. Sunday is pork, Monday is chicken, Tuesday is fish/seafood, Wednesday is wraps/sandwiches, Thursday is soup, Friday is beef and Saturday is meatless. With the high cost of grass-fed meats, though, I might find myself searching out more meatless meals. I have already decided to cut back on the quantity of meat in most meals. For dishes that previously used one pound of meat, for instance, I'll cut it down to 1/2 pound or 3/4 pound.
I did not include lunches since those are normally leftovers or sandwiches, but I did include breakfast for six days. Again, I tried to shoot for variety and have things like eggs/toast, pumpkin pancakes or waffles with orange syrup, oatmeal, creamy rice pudding, sausage/egg rollups and biscuits and gravy. My family loves dessert so I included one dessert per week, but will probably make a few more depending on how much of a sweet tooth we get.
To make shopping easier I made a twice monthly shopping list that details everything I will need for two weeks. I did not get nitty-gritty and include things like baking soda and flour, but I did include things like pecans, eggs and buttermilk. I want to make sure I get the correct amount of eggs,milk, cheese, etc. from wherever I decide to purchase them and not run out before I get a chance to get more. Since I'm trying to stay grass-fed and pasture-raised, I don't want to get store-bought milk and eggs if I can avoid it.
Unfortunately, I wasn't able to do a screen-capture or upload a copy of either the menu or shopping list. If you are interested in either one, please leave me a comment and I will email them to you. I'm bummed because it would have looked so cool in the post.
I do, however, plan to start making a monthly trip to Whole Foods, Earth Fare or Trader Joe's and a twice monthly trip to the farmer's market. I also plan to increase my order from Bread Becker's to take advantage of their bulk grains and beans. I would love to be able to order from Azure Standard, but it doesn't look like it's a good deal to have it shipped to the east coast.
As always, I started with the internet and began researching monthly menu planning. I've done this in the past, but haven't stuck with it for any length of time. I found that in the past I didn't spend enough time planning everything out before trying to implement it. This time around I'm spending several weeks getting the menu just right, making sure it's filled with foods we won't mind eating on a monthly basis and making sure we have plenty of variety. As part of my healthy eating goal I've made sure the majority of the meals utilize healthy cooking techniques and ingredients.
For now I'm going to try to plan one menu to last us at least 3 months. The menu will simply repeat itself at the beginning of each month. I did not plan for holidays or special events, but figure that should not be a problem as we get to them. Each day of the week uses a different meat or type of dish. Sunday is pork, Monday is chicken, Tuesday is fish/seafood, Wednesday is wraps/sandwiches, Thursday is soup, Friday is beef and Saturday is meatless. With the high cost of grass-fed meats, though, I might find myself searching out more meatless meals. I have already decided to cut back on the quantity of meat in most meals. For dishes that previously used one pound of meat, for instance, I'll cut it down to 1/2 pound or 3/4 pound.
I did not include lunches since those are normally leftovers or sandwiches, but I did include breakfast for six days. Again, I tried to shoot for variety and have things like eggs/toast, pumpkin pancakes or waffles with orange syrup, oatmeal, creamy rice pudding, sausage/egg rollups and biscuits and gravy. My family loves dessert so I included one dessert per week, but will probably make a few more depending on how much of a sweet tooth we get.
To make shopping easier I made a twice monthly shopping list that details everything I will need for two weeks. I did not get nitty-gritty and include things like baking soda and flour, but I did include things like pecans, eggs and buttermilk. I want to make sure I get the correct amount of eggs,milk, cheese, etc. from wherever I decide to purchase them and not run out before I get a chance to get more. Since I'm trying to stay grass-fed and pasture-raised, I don't want to get store-bought milk and eggs if I can avoid it.
Unfortunately, I wasn't able to do a screen-capture or upload a copy of either the menu or shopping list. If you are interested in either one, please leave me a comment and I will email them to you. I'm bummed because it would have looked so cool in the post.
Monday, October 17, 2011
Sourdough Banana Bread
I just finished my sourdough starter and am praying that it's okay. I was, and am still, a little concerned about it not being right. I got varying information in all of my research, with some sites saying to cover with plastic wrap and others saying to cover with cheesecloth. I had some saying to feed once per day and others feeding every 12 hours. Hmm, what's a girl to do?
I decided to make a batch of Sourdough Banana Bread since I have the sourdough and bananas needing to be used. I took the recipe from Wild Yeast Blog and tweaked it slightly. I don't like using a lot of oil in my baking so I substituted 1/2 cup of applesauce for 1/2 cup of the olive oil, used 250 g. of Sucanat and 50 g. of honey, left out the lemon zest and used all banana. I also added about 1/2 cup of chocolate chips to one loaf. This recipe made two 8x5-inch pans and one smaller loaf.


In addition to this banana bread I plan to make Mexican Chocolate Cupcakes, No-Knead Sourdough Bread, Sourdough Bread, and Pancakes.
In order to make all of these wonderful things, I've placed several items on my Amazon wishlist, including a digital scale, The Bread Bible book, Silpat, and Kefir grains. I'm so excited to begin this amazing journey! I can't wait to get them ordered.
October 18, 2011 Update: The banana bread is wonderful. It's nice and moist and full of flavor. The pancakes this morning turned out fine, though a bit tough. I think they would be wonderful as a cross between bread and tortillas. I put fresh peanut butter (from Whole Foods) and raspberry jam on mine to make a sandwich.
I decided not to make the cupcakes as I didn't keep enough starter out. I put roughly 2 cups in the refrigerator and left one cup out. I added 1 cup of flour and 2/3 cup of water to the one I left out and it grew slightly overnight. I used that this morning for the pancakes, No-Knead bread and regular sourdough bread. The sourdough bread is currently in its final rise and waiting to go into the oven. The No-Knead is in its overnight resting phase and will be baked around mid-day tomorrow.
I couldn't wait any longer and ordered my Kefir grains and the digital scale last night.
I decided to make a batch of Sourdough Banana Bread since I have the sourdough and bananas needing to be used. I took the recipe from Wild Yeast Blog and tweaked it slightly. I don't like using a lot of oil in my baking so I substituted 1/2 cup of applesauce for 1/2 cup of the olive oil, used 250 g. of Sucanat and 50 g. of honey, left out the lemon zest and used all banana. I also added about 1/2 cup of chocolate chips to one loaf. This recipe made two 8x5-inch pans and one smaller loaf.


In addition to this banana bread I plan to make Mexican Chocolate Cupcakes, No-Knead Sourdough Bread, Sourdough Bread, and Pancakes.
In order to make all of these wonderful things, I've placed several items on my Amazon wishlist, including a digital scale, The Bread Bible book, Silpat, and Kefir grains. I'm so excited to begin this amazing journey! I can't wait to get them ordered.
October 18, 2011 Update: The banana bread is wonderful. It's nice and moist and full of flavor. The pancakes this morning turned out fine, though a bit tough. I think they would be wonderful as a cross between bread and tortillas. I put fresh peanut butter (from Whole Foods) and raspberry jam on mine to make a sandwich.
I decided not to make the cupcakes as I didn't keep enough starter out. I put roughly 2 cups in the refrigerator and left one cup out. I added 1 cup of flour and 2/3 cup of water to the one I left out and it grew slightly overnight. I used that this morning for the pancakes, No-Knead bread and regular sourdough bread. The sourdough bread is currently in its final rise and waiting to go into the oven. The No-Knead is in its overnight resting phase and will be baked around mid-day tomorrow.
I couldn't wait any longer and ordered my Kefir grains and the digital scale last night.
Friday, October 14, 2011
Sourdough Starter Day 5
I think my starter is beginning to come together. It's doing exactly what the tutorial said it would and the odor is getting fainter and sweeter. I did remember to take pics this morning.


View from top with weird, but really cool bubbles.

No Dairy No Chocolate "Chocolate" Pudding
Horse Girl is using the book Nutrition 101: Choose Life for her health credit this year. Each chapter has a recipe to try that utilizes foods that benefit the particular part of the body that was just studied. We are getting ready to start studying the respiratory system and the first recipe happens to be for chocolate pudding. This recipe intrigued me because it was specifically mentioned at the booth when I was researching the book at the last home school convention and also because I think I'm sensitive to both dairy and chocolate. So, daring to be brave and try something I have never liked, I took the plunge and bought the avocados for the recipe and gave it a shot a few days ago.
Verdict: husband, daughter and I did NOT like it. Son liked it, but said his ears started to feel funny within a few minutes. Husband actually said it tasted like it had a dirty dish rag in it. Daughter and I just thought it tasted odd. It might be an okay recipe if you take it one step at a time and replace the more common ingredients over time. It uses avocado in place of dairy, carob powder in place of cocoa powder and honey in place of sugar.
Here's the recipe if you're interested in trying it.

2 small ripe avocados
1/2 to 3/4 cup Blue Agave Nectar, raw honey, or Grade B Maple syrup
1/4 cup carob powder
2 tablespoons coconut milk or rice milk
1 tablespoon organic vanilla extract
Pinch of sea salt
Pinch of cinnamon (optional)
Make sure the avocados are ripe, as unripened avocados will change the flavor. Place the ingredients in a blender or food processor and blend on high until smooth. Chill until serving. Makes about two cups.
Verdict: husband, daughter and I did NOT like it. Son liked it, but said his ears started to feel funny within a few minutes. Husband actually said it tasted like it had a dirty dish rag in it. Daughter and I just thought it tasted odd. It might be an okay recipe if you take it one step at a time and replace the more common ingredients over time. It uses avocado in place of dairy, carob powder in place of cocoa powder and honey in place of sugar.
Here's the recipe if you're interested in trying it.

2 small ripe avocados
1/2 to 3/4 cup Blue Agave Nectar, raw honey, or Grade B Maple syrup
1/4 cup carob powder
2 tablespoons coconut milk or rice milk
1 tablespoon organic vanilla extract
Pinch of sea salt
Pinch of cinnamon (optional)
Make sure the avocados are ripe, as unripened avocados will change the flavor. Place the ingredients in a blender or food processor and blend on high until smooth. Chill until serving. Makes about two cups.
Wednesday, October 12, 2011
Sourdough Starter Day 3
I forgot to take pictures this morning before pouring off the dark liquid and mixing in the new flour and water, but boy, did it stink. I think it's supposed to be stinky if I remember correctly from the directions. Horse Girl said it smelled like a dirty diaper. I'm not sure what I would compare the smell to, but let's just say it wasn't pleasant.
Tuesday, October 11, 2011
Sourdough Starter Day 2
I've decided to try my hand at making a sourdough starter. I found directions on the Heavenly Homemaker site at this link. You need to scroll all the way to the bottom to find day 1 and then wind your way back to the top to finish with day 8. This link also has recipes for different ways to use your sourdough once it's finished.


Morning of day 2 with a layer of dark liquid, hooch, on top.

View from the top.

After 1 cup of flour and 1 cup of cold water have been added and thoroughly stirred. It is now sitting on top of my refrigerator.
Cornbread using soaked grains
I recently came across information on soaking grains to get the most out of them nutritionally. I decided to try a recipe called Blender Batter Cornbread from Sue Gregg. It turned out phenomenal. I am saving it for cornbread stuffing tomorrow evening, but this may become a staple item for us. I just had some for a snack and I can see making a whole meal out of it. I should have taken a picture this morning after it had been sitting for 24 hours.


Batter ready to go into the oven.

Out of the oven and cooled a bit. It sank down in the middle, but it still tastes awesome.
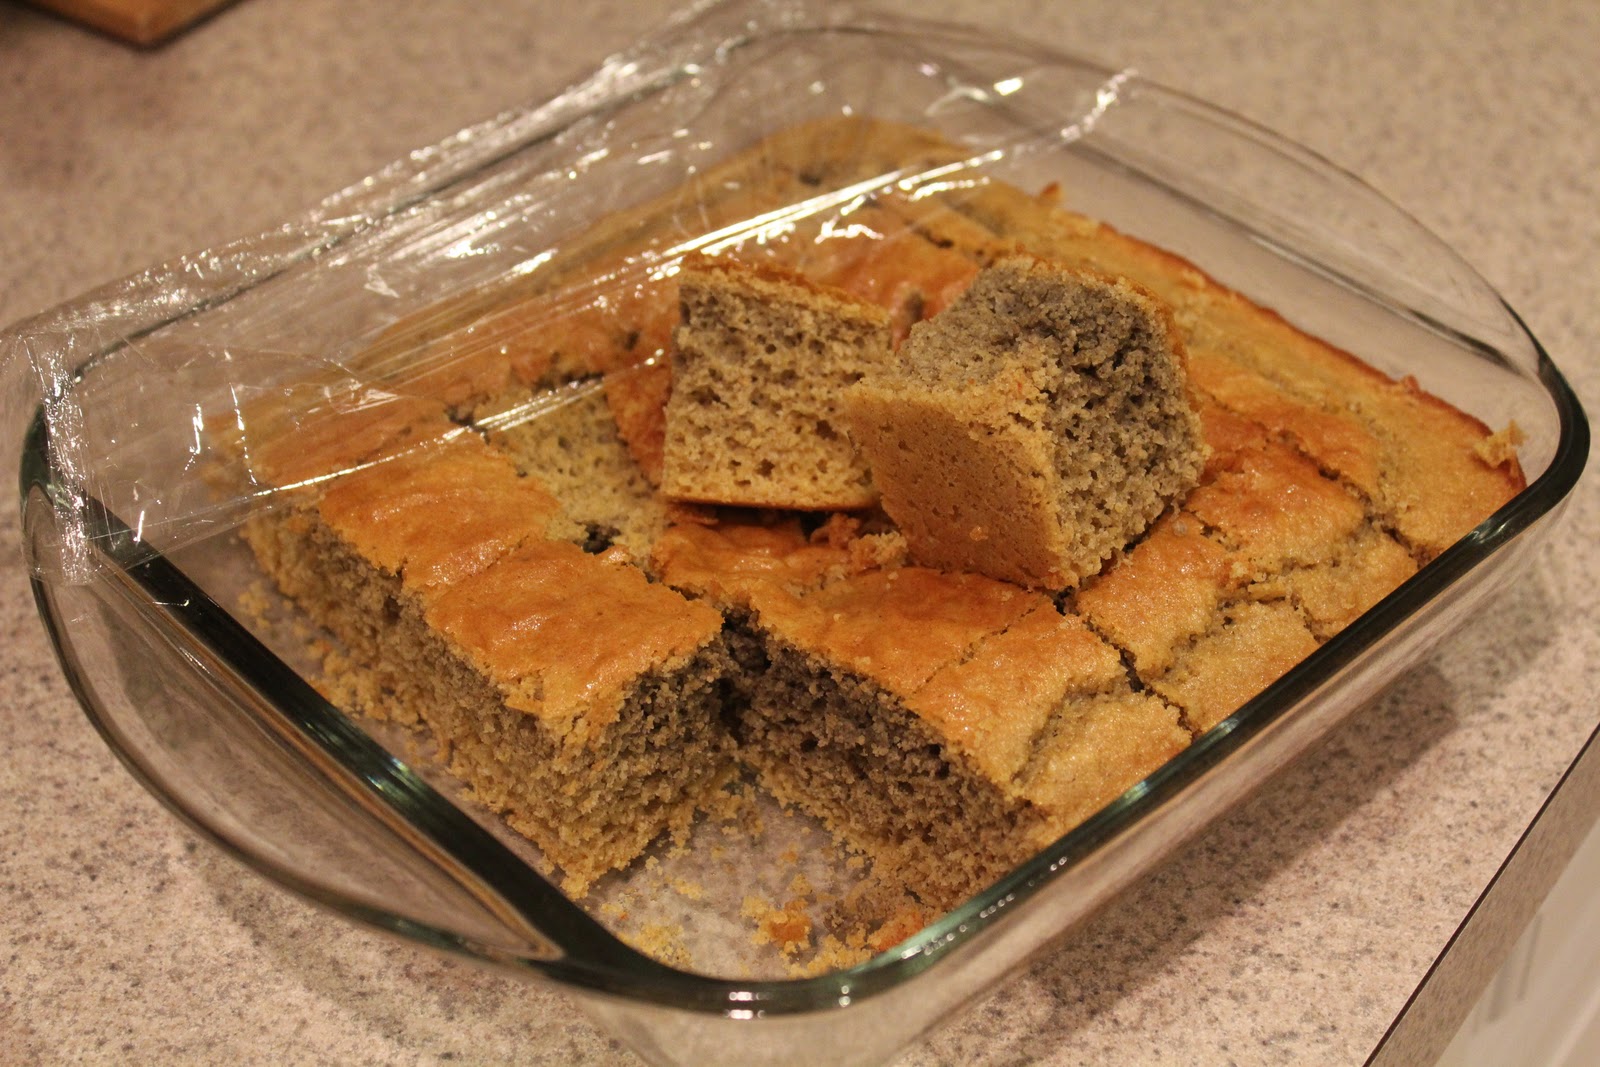
Unfortunately I spoke too soon and this is what the cornbread looked like several hours later. It's a weird grayish color inside. I'm not sure if it's still safe to eat. Any ideas?
Wedding Pics
A few pics from my husband's brother's wedding in August.

Me with both kids

Me with husband

The whole family
Subscribe to:
Posts (Atom)


 Posts


